 |
Nuclide
Software Development Kit for id Technology (BETA)
|
 |
Nuclide
Software Development Kit for id Technology (BETA)
|
 Nuclide does not come with a built-in level editor, you're encouraged to use one of many variety of editors maintained by the id Technology enthusiast community.
However, we have integrated gamepack building support for GtkRadiant. If you are new to level design or want to brush up on your knowledge, look no further than GtkRadiant's documentation page for level designers.
If you have issues with GtkRadiant or any other editor, please file bugs with said project and not with Nuclide.
 If your workstation has all the dependencies (
pacman -S git scons libxml2 gtk2 freeglut gtkglext subversion libjpeg-turbo) installed, you can build the default version of Radiant like so:
And then run it using the launcher at ./radiant.
netradiant-custom as the target.You will probably want Nuclide's build system to generate a game pack for that installation of Radiant. This can be achieved by running:
Where GAME=base is used to specify which game to build. That should match the name of your game directory. After that, you will be able to select your game from within Radiant.
defs-wad can be used instead of defs.
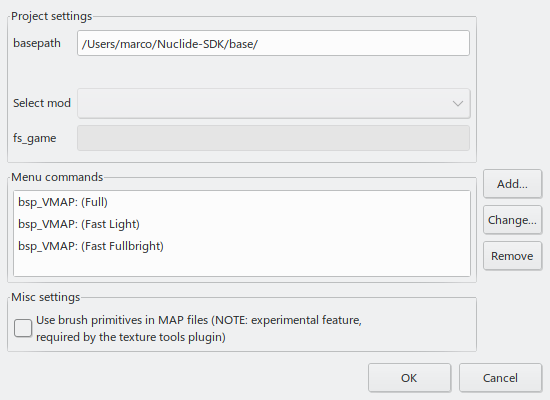
The generated gamepack will attempt to build with vmap. You can change this of course, by setting up your own toolchain under File > Project settings....

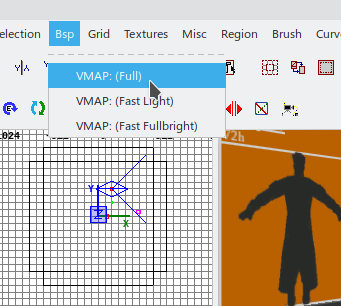
In the menu-bar you'll find the Bsp menu, under which a few choices will be visible:

This is more or less what the default build options for your level will look like.
Clicking any of them will result in your map file being compiled into a bsp file, which contains the final level geometry, entity data and lighting built into one blob file.
 The final bsp file output will be alongside your map file. Ensure it's within your
 <gamedir>/maps directory so you can test it.
To run your level, execute this in the engine/game console (SHIFT+ESC):
And that's all there is to know about getting started building levels with Radiant and Nuclide.
 Here we'll run down the practices of lighting your map using WorldSpawn and vmap.
The light_environment entity will do the bulk work. It emits light from any sky surface, such as common/skyportal. The amount of samples specify how many passes are done. This will be evened out to match the desired intensity, so increasing samples does not make the map brighter.
Using more than 1 sample is useful if you want less harsh-shadows. Even a value of 4 with a sunspreadangle of e.g. 5-10 degrees is sensible for day-time maps. It makes them look less artifacting too. The theory is, the cloudier the world is, the softer the shadows are - so we need more samples and a sunspreadangle that's wider to accommodate that.
The sunspreadangle will determine how far apart the different samples will be spread. E.g. if you set it to 0 it will do nothing. Every light_environment sample will take place on the exact same spot, from the same angle. However if you set it to 360 (the maximum amount), each sample will spread out to get a full 360 coverage of the map. Resulting in a lightmap without any real contrasting shadows.
99% of the time it's going to be white. Let _ambient inside your light_environment tint the shadows the color of the sky, let radiosity do its job. Radiosity can't do its job if the sun color is non-white.
The effects of radiosity will be barely visible using a non-white light_environment color.
Case in point: The overwhelming tint of orange/brown in id Software's game Quake II.
Set _ambient in your light_environment to whatever the color of the sky is set to. This determines the color of the shadows cast by the light_environment. This does not create a minimum ambient intensity in the process
In your worldspawn entity keys, you can add a _minlight intensity value, as well as a _minlight_color value to an entity. Then, any lightmap based lighting will ensure to be at least that level of brightness.
This is not something you want to use for anything meant to look natural.
The absolute lighting level of the map is raised. This has the tendency to flatten the difference between light and shadow. The dynamic range of the light is affected negatively as a result.
It raises the lighting level-wise, but keeps the light values of each entity/sky/shader intact.
Only use this as a last resort in case you want to make sure there are no black/dark areas in your level.
With floodlight, light becomes darker in closed spaces and brighter in wide open spaces.
The worldspawn key for that is _floodlight, with you specifying 5 whitespace separated values for the key:
The side effect is that it'll obviously act as a contrasting knob. It does not fix spaces where light wasn't present to begin with!
Yes, you should use radiosity. It fixes most problems with lighting your level!
Valve's BSP compiler used for Half-Life 2 cast light rays with a maximum of 8 bounces, which is sensible. You can even set it to 100 and it'll stop once photons lose their energy.
The alternative to radiosity is direct lighting, which is what is used in the original Quake.
The difference between direct lighting and radiosity is that when the latter light hits a wall, it reflects and bounces around the room, although it loses some of its energy. It will also absorb some of the color of the surface it bounces against.
The end result is you can illuminate environments more evenly.